Title
Facebook Maintenance Manual
cover sub text
Use this guide to build a Facebook Page for the long haul

TOC Title
Table of Contents
Intro
Admin View
Page Name
Post as Page
Custom Status
Post Tips
Manage Aps
Schedule
Intro title
Introduction
intro text
Whether you’re new to Facebook or just want to use it more effectively for your business, this manual will help you learn to use some of the platform’s more advanced functions. It’s designed to help you optimize your business’s Facebook presence, show you how to set up and maintain your Page for success, and teach you how to use apps to build a powerful presence on Facebook.
Ready? Let’s get started!
puter

convert title
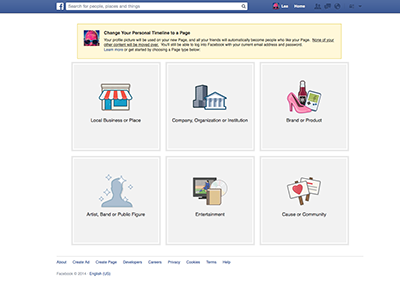
How (and Why) to Convert a Facebook Profile to a Page
Rich Text
Although it’s been possible since March of 2012, many Facebook users still don’t know that a Facebook profile can easily be converted into a Page. Facebook calls the process a “Profile to Business Page Migration” and you can do it by using this tool here.
convert text
Why you should convert your profile to a Page: Facebook Pages offer unique tools and features for organizations, businesses, brands and “public figures.” Facebook defines a public figure as an individual who may be a celebrity, writer, musician or may be a self-employed business consultant or other “personal” brand.
If you are using Facebook as a business tool, you will want to set up a Page because it gives you access to many powerful marketing tools, including ads and apps. It is also a violation of Facebook’s Terms to use a personal account to represent something other than yourself (for example, to use a profile to represent your business). You can, however, continue posting to your “audience” from your personal account by allowing followers. When people follow your personal account, they’ll be able to get your updates in the News Feed without being a friend of yours.
If you’re using your Facebook profile to represent something other than yourself, you could risk permanently losing access to your account and all of its content if you don’t convert it to a Page. For instance, internet sensation Grumpy Cat can’t have a Facebook profile because she’s a cat, but she can have a Facebook Page.
what to know before
What to know before you convert your profile to a Page: Prior to converting a profile to a Page, there are a few things you should be aware of. As soon as you convert, all of your friends (and followers) will become Page Likes – so if you have 2,000 Facebook friends, you’ll have 2,000 Page Likes.
All of your uploaded photos will be transferred to the Page but all other content will be lost. Login information will remain the same and your account’s username will become your Page’s name.
If you don’t want to lose all your profile content, access your account settings and download a copy of your Facebook data before starting the migration process.
By the way, Facebook does not allow a profile to be converted into an already existing Page. For example, if you have a fan Page with 10K Likes and a personal profile with 5K friends/subscribers, Facebook will not allow you to convert your personal profile into the already existing brand Page to make 15K Likes.
Rich Text
Download Facebook Data
Image

Rich Text
Note: You can have both a Facebook profile and a Page. While some people might find this difficult to manage, Facebook guru Mari Smith maintains both because, as she told us via Twitter, it provides her with “2 marketing channels, 2 opportunities for News Feed visibility,” and it allows her to bypass the 5K friend limit by having followers.
Intro title
Facebook Page Admin View
puter

Admin overview
Admin View Basic Overview
admin text
- Default admin view of a business’s Facebook Page
- Access to Notifications, Messages, and Scheduled Posts
- Detailed analytics for the Page by date, posts, etc.
- Access to Page Info, Page Roles, and other Page Settings
- Invite Friends, Import Contacts and Use Ads Manager
- Quick glance at weekly Page Likes, Post Reach, new Notifications and Messages
- Cover photo
- Profile Picture
- Basic details and links for your company
- Link to your top app
- A list of all installed apps
- Quick link to Insights, Ads, Page Share and Create a Page
Intro title
How to Change a Page’s Name


intro text
Only Admins or Editors can change the name of a Page. If your Page has fewer than 200 Likes, and you want to change its name, you will do so from Page settings:
- From the top of your Page, click Settings
- Select Page Info from the left-hand column
- Click Edit on the right of the Name field and enter a new name
- Click Save Changes
intro text
If your Page has more than 200 Likes, you can submit a name change request to Facebook:
- From the top of your Page, click Settings
- Select Page Info from the left-hand column
intro text
- Click Edit on the right of the Name field. Fill out the form with the required information and click Send
Rich Text
Note: If your Page has more than 200 Likes, you can only change your Page name once. If your request has been approved, you won’t be able to submit another request for that Page.
Changing your Page’s name will not affect its username or Page address.
Intro title
Why it’s Important to Assign Admin Roles and Establish Rules
puter

Rich Text
Note: To make someone an admin of your Page, they must have Liked the Page.
intro text
Facebook allows five different administrator roles: Admin, Editor, Moderator, Advertiser and Analyst. Each role has different capabilities – only Admins have the ability to change each admin’s role. Facebook makes all admins Editors by default.
The chart to the left shows Facebook’s five admin roles and what each can do.
Most Facebook Pages are managed by multiple administrators. You can have as many admins on a Page as you want but two or three should be able to handle the job. To add an admin, go to “Edit Page” on your Timeline and then click “Admin roles.” Scroll down and select “Add another person.”
Rich Text
To prevent conflict amongst your employees, and before you assign your Facebook Page’s admin roles, establish some company-wide guidelines. Some things to consider:
Rich Text
- Have a Facebook training session once a quarter. Discuss roles and address etiquette and expectations for employees who manage the Page. At the quarterly meeting, discuss new Facebook features, address concerns about previous posts and talk about new tactics that you’d like to implement.
- Define the voice of your Page. Each individual has a unique voice, but when representing a business or brand on a Facebook Page the Page admins should work together to form a consistent voice. Make sure that your Page admins understand the established voice and that they are expected to use that voice when communicating with users and fans online.
- Keep a shareable document (e.g., a Google doc) that outlines company social media policies. Employees should refer to the document at any time when they need to know what to post – and what not to. This document should also include recommendations about how to interact with your Facebook fanbase.
Rich Text
- Keep admins to a minimum. Don’t give just anyone admin rights to the Facebook Page. The fewer people managing a Page, the better. Two or three admins actively updating, responding to inquiries and managing the Page is plenty.
- Keep communication between admins open. “If you’re not sure, ask!” is an elementary concept, yet it’s an important one. Whether responding to a particularly difficult user comment or sharing an article on your Timeline, establish a rule of thumb that if any admin is unsure about whether or not something is appropriate, s/he should ask another admin for an opinion. Encouraging Page admins to have open communication with one another will help reduce mistakes.
Intro title
How to Post as the Page Instead of Yourself
Change User
Change Facebook User
use-as

use as menu

Rich Text
- When you comment or post to a Page that you manage you have the option to post as the Page instead of yourself. Notice that underneath the Graph Search box, you can choose how your post will appear.
- Click the down arrow icon in the upper right-hand corner, and choose to “Use Facebook as” a Page that you have administrative access to. When using Facebook as a Page, you will see the Page’s News Feed, and the Status Updates and comments you create will come from the Page, not from your personal profile.
Intro title
How to Customize Status Updates
Rich Text
Facebook provides many features that allow Page admins to customize Status Updates so Pages can draw more attention to their Timeline content. Below are nine functions of a Status Update, along with information on how and when to implement each.
Pin a post
Pin a Post
To pin a Facebook post, click on the down arrow icon in the upper right corner of the post and click “Pin to Top” in the drop-down menu. The post will then move to the top of your Timeline where it will remain for seven days. This allows you to highlight an important post such as a sale, a new product feature or an event announcement.
To unpin a post, click the drop-down menu of the pencil again and click “Unpin from top.”
pin image

highlight' a post
Highlight a Post
To highlight a Facebook post, click on the down arrow icon in the upper right corner of the post and click “Highlight” in the drop-down menu. This stars the post. Highlight a post when you have an important announcement or want to feature a particular photo on your Timeline.
To unhighlight a post, click the drop-down menu in the upper right corner of the post and select “Remove from Highlights.” The post will no longer be starred.
Image

target a post
Target a Post
Facebook allows you to target your posts by the following: Gender, Relationship Status, Educational Status, Interested In, Age, Location and Language. To target your post, first make sure “You are posting, commenting and liking as” your brand. Next, click on the small grey compass icon on the bottom left of the Status box and add your targeting preferences. Facebook will then show you how many people from your fanbase your post is targeted to.
Target your post when you want to share an announcement or specific content that is only valuable to a segment of your fanbase.
Image

loacation to post
Add a location to your Post
To add a location to your post, click on the small pin drop icon on the bottom of the Status box. Begin typing your location in the “Where are you?” section and Facebook will auto-generate relevant nearby locations.
If your company is reporting about a live event, or hosting an event in a specific location, highlighting the location could be valuable but it’s not something that’s necessary for all posts.
Image

schedule a post
Schedule a Post
To access the scheduling feature, go to your Timeline and click into the Status box. In the bottom left corner click on the small grey clock icon. Within the clock you’ll be given the option to choose the date and time (up to six months ahead) that you’d like to schedule a post.
If you don’t have time to update your Page’s Facebook status every day, consider using Facebook’s scheduling feature to schedule several posts over a few days or a week – planning ahead will make your life easier. It will also allow you to plan posts during the times that your users are the most engaged.
Image

boost a post
Boost a Post
To promote a post, aka “Boost Post,” go to any post you’ve recently created on your Page’s Timeline. In the bottom right corner of the Status box, click “Boost Post” and select your budget based on how many people in your fanbase you want your post to reach.
Boost a post when you have content that’s important for a large percentage of your fanbase to see. For example, if your company is using a Status Update to promote their annual blowout sale, boosting the post will help more people see it.
Image

Offer post
Create an Offer
There are two ways to create Facebook offers: from the Status box on your Timeline or from Facebook’s ads create tool. To create an offer from Timeline, click on the “Offer, Event+” option in the top of the Status box. From there you can create your offer by uploading a photo, inserting your offer description and setting your offer’s expiration date.
Offers are only available on Pages with at least 50 Likes. If you have 50 Likes or more, create an offer with a special promotion for your fans. The offer might be for a discount, free shipping, or even a buy-one-get-one-free deal. Offers are a great way to drive sales from a Facebook Page!
Image

Image

event post
Create an Event or Milestone for your Page
To create an Event from the Timeline, click on the “Offer, Event+” option in the top of the Status box. From here, select whether you want to create an “Event” or a “Milestone.”
Create an Event if your company wants to promote an event that requires tickets to get in. Within the Event’s options, you can add a link for guests to get tickets, as well as add targeting to the event and other event information. Create a Milestone for occasions like your business’s five year anniversary or the day your Page hits 10,000 Likes!
Host a Timeline promotion
Facebook announced in August of 2013 that Pages can host promotions on their Timeline. To create a Timeline promotion, craft a Status Update that includes promotion details, rules and necessary Facebook disclaimers.
There are many reasons to host Timeline promotions, including driving engagement from your fans or to promote your store’s sale. Here are 5 Awesome Timeline Contest Ideas.
Image

Image

Rich Text
Note: Even though Facebook lifted the “20 percent text rule” for Cover photos, the rule is still in effect for promoted posts and other Facebook advertising.
Intro title
Tips for Better Timeline Posts
use as menu MOBILE

Rich Text
Better Timeline Posts
- Share a tip – Start the update with “TIP” so it stands out in followers’ feeds.
- Post the most interesting fact related to your content – and link to the rest. Compelling updates make readers want more.
- Engage – Respond to comments and answer questions; don’t ignore (or remove) negative feedback.
- Stay positive – Positive/helpful updates inspire more engagement than negative ones.
- Host a Timeline contest or promotion – Pages can now host contests and promotions right on their Timelines by asking fans to Like or comment. (Use a third-party provider to pick a winner, aggregate and export data.)
- Include images – Posts with images are more likely to be shared.
- Make images mobile friendly – Since most users access Facebook via mobile, choose simple, clear images that are easy to see from a phone/tablet.
use as menu
Intro title
How to Choose the Platform that Will Give Your Facebook Page Super Powers
use as menu

Rich Text
Installing apps on your Facebook Page can make the Page super powerful and engaging. You can use apps to host contests, feature forms, newsletter signups, menus and much more. But unless you know computer coding and can build your own apps, you’ll need to work with a third-party app provider.
There are lots of third-party app providers to choose from – ShortStack is one of them – but you’ll want to make sure the one you choose offers a few key features:
Rich Text
- The app should be flexible. If it’s not customizable, the app might not give you the results you’re after.
- The price should be right. There are third-party providers that are free and there are some that can cost thousands of dollars a month. Obviously using a provider that’s low-cost or free, reduces your risk if the app or promotion doesn’t deliver the results you’re after.
Rich Text
- The app should be embeddable or have the ability to be published to the web. Many third-party apps only work on Facebook. Look for one that allows you to install the contest on your website, too.
- The app must have mobile capabilities! Why? Because according to Facebook’s 2013 Third-Quarter Report, 874 million of its active users access Facebook from a mobile device. This number increases each year. Why not make it easy for mobile Facebookers to get to your contest or other apps?
Intro title
How to Manage Your Timeline Apps
Rich Text
As explained in the previous section, an “app” is a Facebook feature that enhances your brand Page and your visitors’ experiences. Photos, Events, Likes, Contests, Maps, etc., are all Facebook apps (at ShortStack we call them Campaigns). Some are permanent parts of a Page, some are add-ons. They appear as rectangular boxes on the left-hand side of the Timeline below the About section.
All installed apps are visible to the public under the “More” tab next to the Profile Picture. Three apps are visible on the Timeline. These apps usually host contests or promotions but may also be forms, menus or other information.
Arrange apps: To rearrange apps, click on the “More” tab and scroll down to click on “Manage Tabs.” Here you can click and drag to rearrange the apps. Note: A link to your first listed app will appear in the navigation bar located next to the Profile Picture.
Customize your app’s thumbnail image: You can upload a photo to use as the image that appears with the thumbnail or you can use a free online tool such as one from www.canva.com to create a custom image.
It’s a best practice to create app thumbnails that stand out and include a call to action in the design. For promotion apps that are featured as one of the three arrangeable apps on the Timeline, this best practice is key to driving the highest number of app views. It’s also a best practice to properly name your apps since this name appears next to the thumbnail.
Rich Text
Arrange Apps
Image

Image

Intro title
How to Make the Most of Your Facebook Page’s Cover Photo
Rich Text
The Cover photo is the focal point of a business’s Timeline profile. It sets the tone of a Page and stands as a visual message alert for whatever it is you want Timeline visitors to know about your brand, or your client’s brand, first.
Among the many ways to make the most of the Cover photo real estate: get into the holiday spirit (whether it’s Christmas or the 4th of July), direct fans to a specific app, showcase new products, promote a Facebook exclusive incentive, create a sense of urgency, establish authority and promote your other social networks.
Rich Text
Cover Photo with CTA
Image

Rich Text
A few other Cover photo best practices:
- When brainstorming Cover photo design ideas, think of ways you can visually answer the question, “Why should a user become a fan of my brand?”
- Update your Cover photo frequently – once a month is ideal.
- Always include a photo description when you update your Cover photo image. Provide links and a call to action within your Cover photo caption copy whenever possible.
- Use arrows and other design elements to direct Timeline visitors' eyes to the Like button.
- Coordinate your Cover photo with your Profile Picture.
- Use or design a Cover photo with optimal dimensions (851 x 315 pixels). Click here to download a Cover photo Photoshop template.
Intro title
Facebook Maintenance Schedule


Rich Text
Want this guide to have and hold forever? Download a PDF!
Links
Intro title
Want to learn more?


